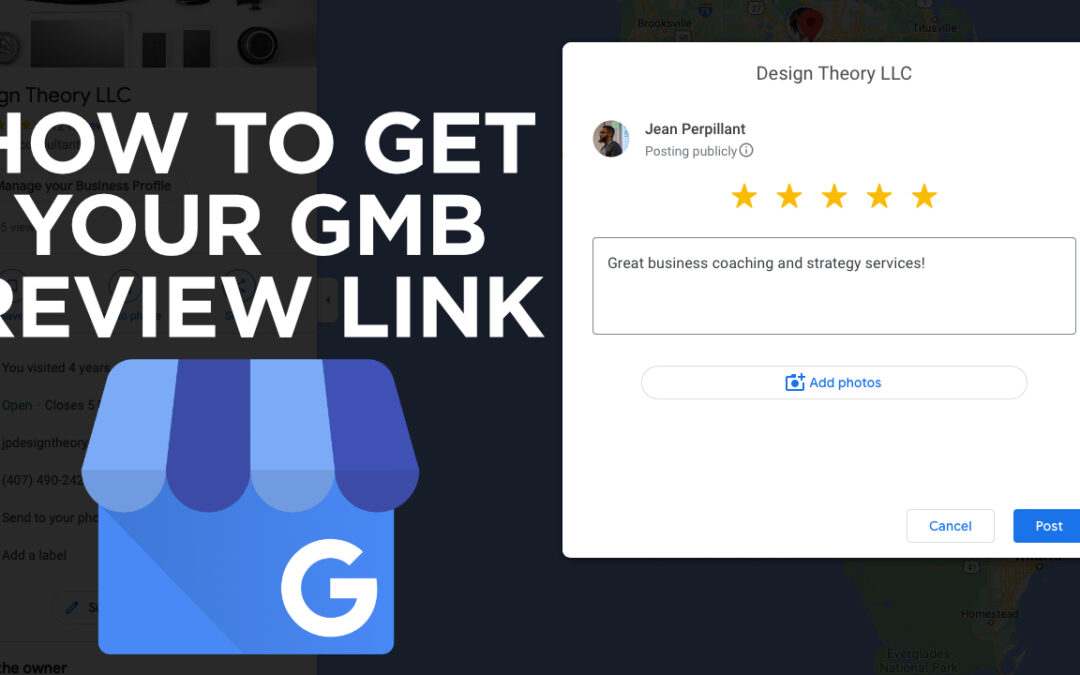
Having your customers and clients leave you positive reviews is a fantastic way to organically grow your business profile on Google. Getting them to engage and leave you a review sometimes may be include a bunch of steps and this short video will show you how to make the whole process super easy and frictionless.
Some unique ways you can use this:
Add your link to your email signature
Automate your “Thank You” email to your clients and include a call to action using this link
On the part of your register that faces your customers during checkout
As part of a repeat customer plan where after providing a 5 Star Review, your customers get a special discount on their next purchase
Create a custom QR code with your companies brand colors and even your logo and place it on a sticker or back of your physical marketing materials
If you would like some ideas or ways to create a marketing strategy to customize your review process, be sure to contact us.
This is a quick “How To” article for anyone else out there that need a reference on how to add a new calendar to Zoom or edit the connection and settings with an existing calendar with Zoom. I recently wanted to update which Google Calendar I wanted my Zoom account configured to and couldn’t find anything directly relevant online so once I figured it out myself, I figured I’d share for anyone else.
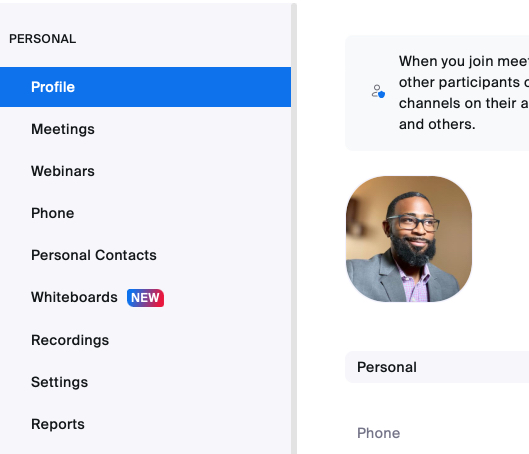
STEP 1 – Log Into Zoom, Go To Your Profile
Once you log into your account and using the left sidebar navigation, click on Profile
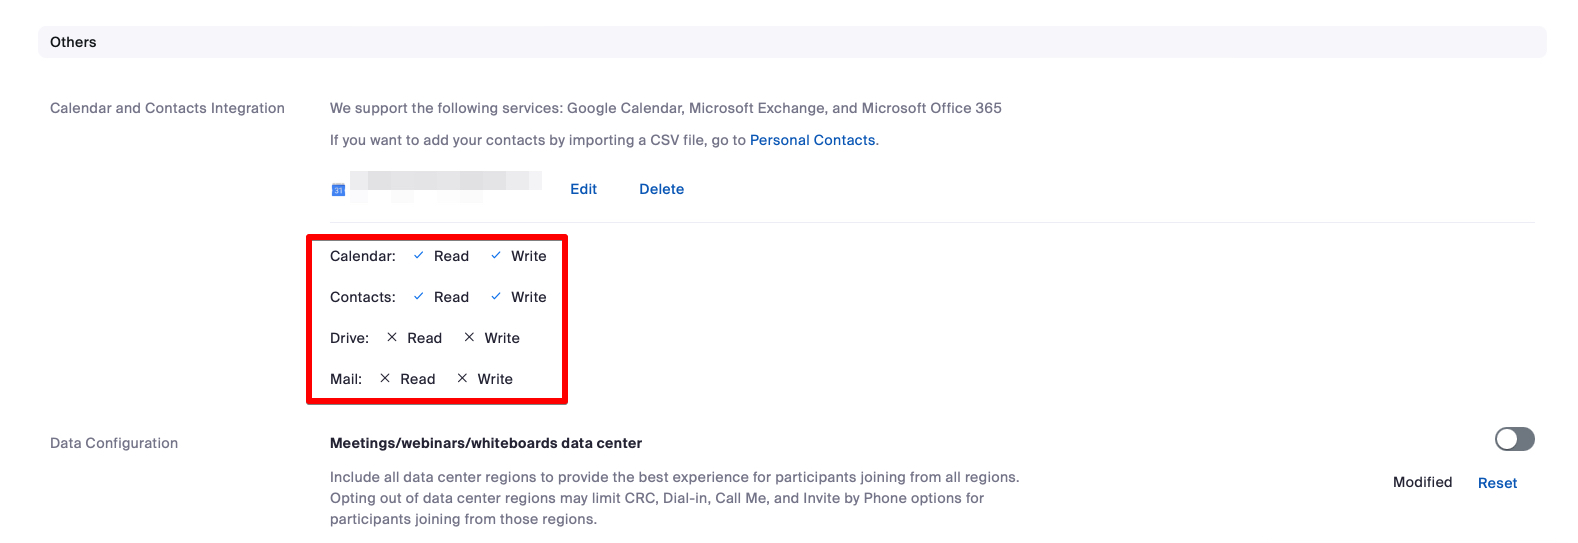
STEP 2 – Calendar Configuration
Scroll to just about the bottom of this page and you’ll see the “Configure Calendar and Contacts Service” button. If you already had a connection and want to change or edit it, you’ll see a screen that looks like the below:
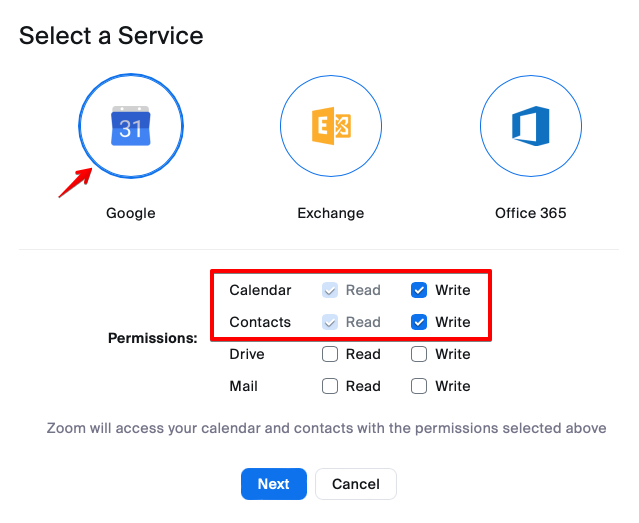
STEP 3 – Select Your Calendar Service
For me I use Google Calendar, but as you can see you can make a connection for Exchange or Office 365, Select whichever you prefer.
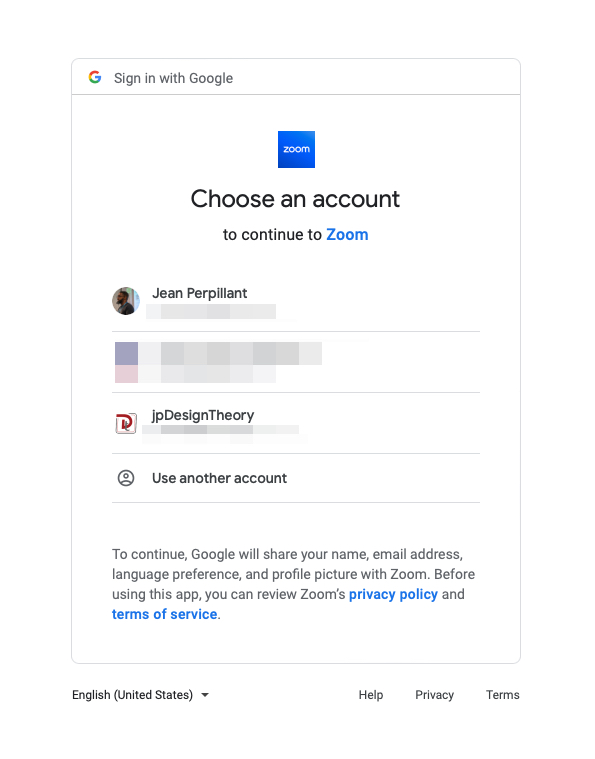
STEP 4 – Choose An Account
Because I’m using Google and I have multiple Google Accounts, I am going to select the one I want used with Zoom.
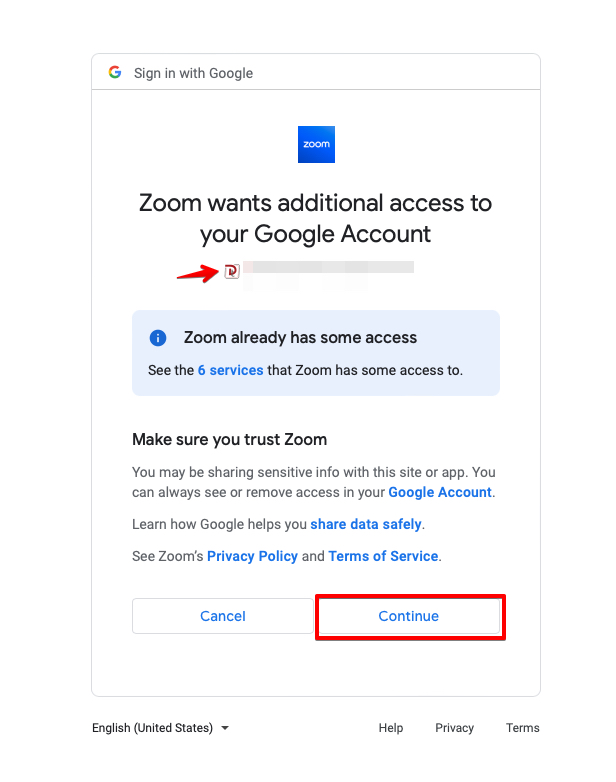
STEP 5 – Allow Access to Zoom
You’ll see it show the icon or user account image for the account I selected from the prior and then click “Continue”
STEP 6 – All Done!
You will be brought back to the main Profile page, and you can scroll down to the bottom of the page again to see the new settings that are now applied.
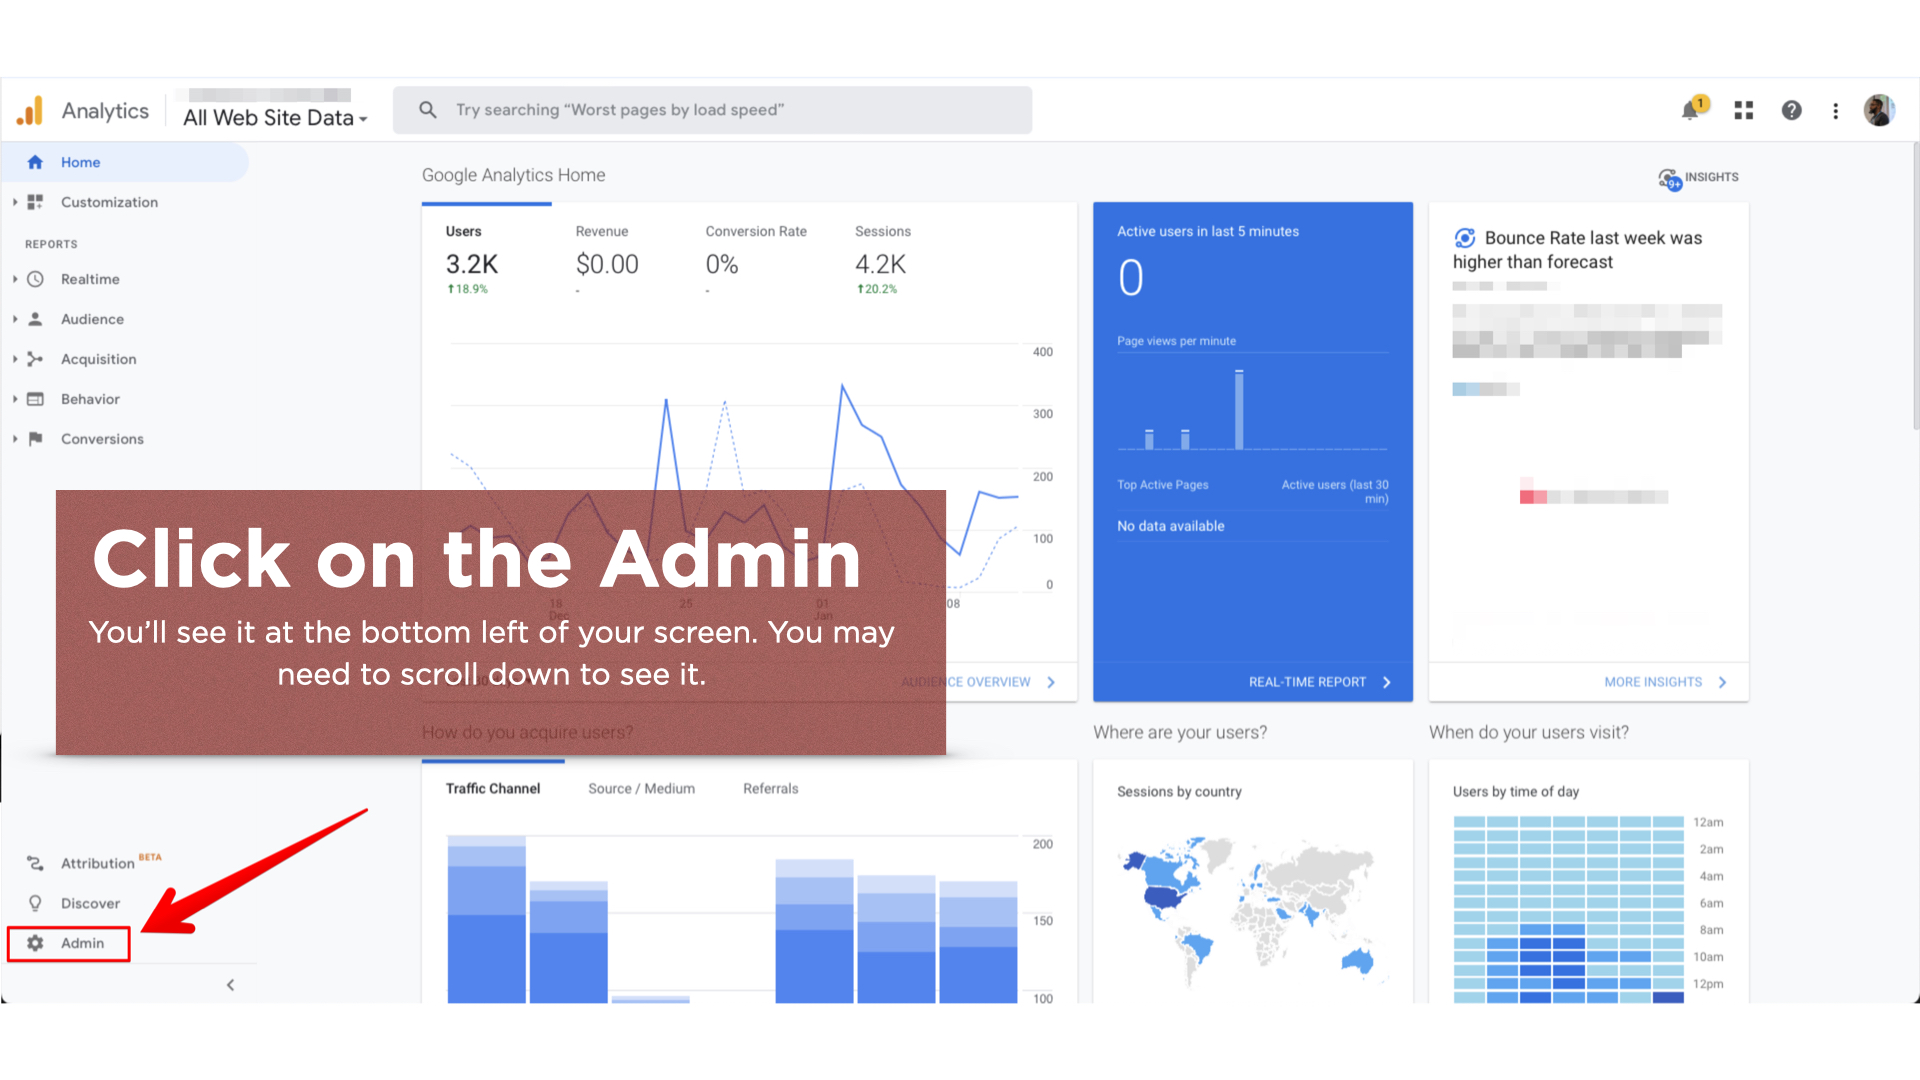
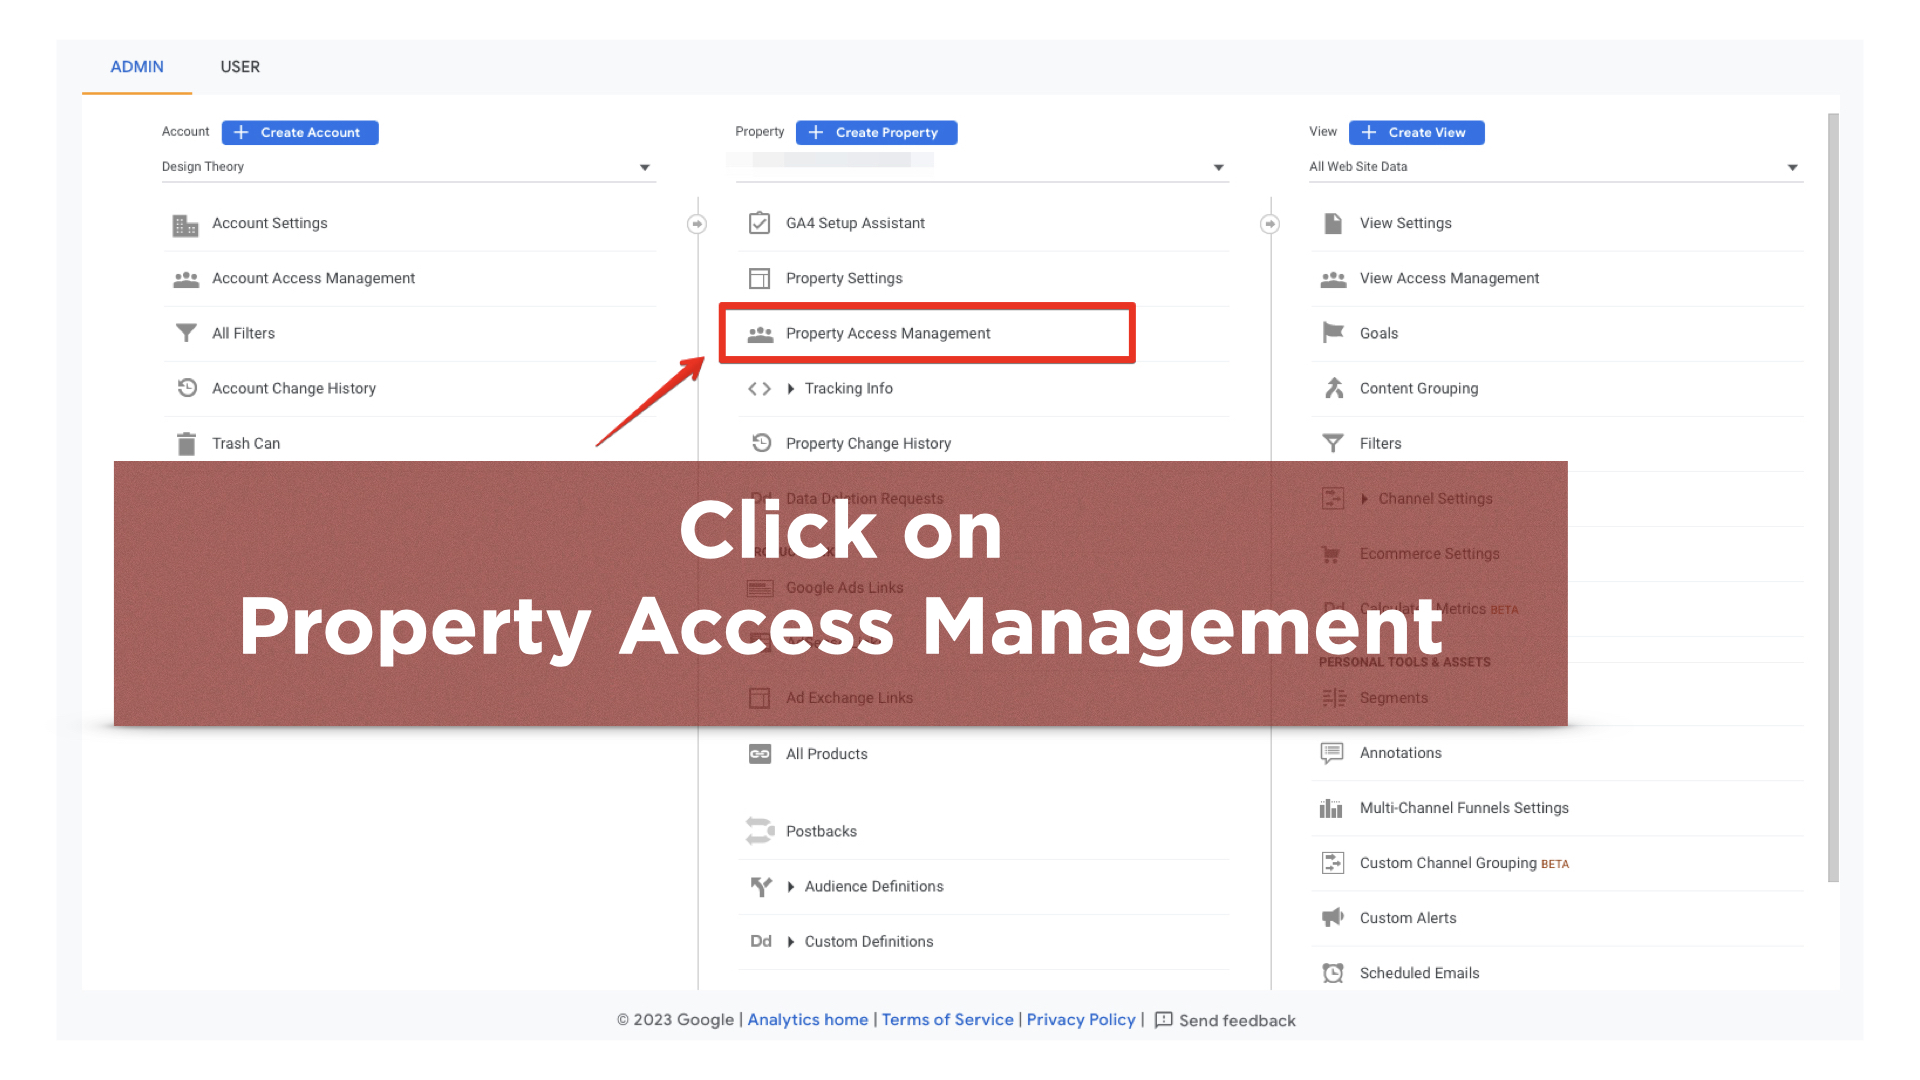
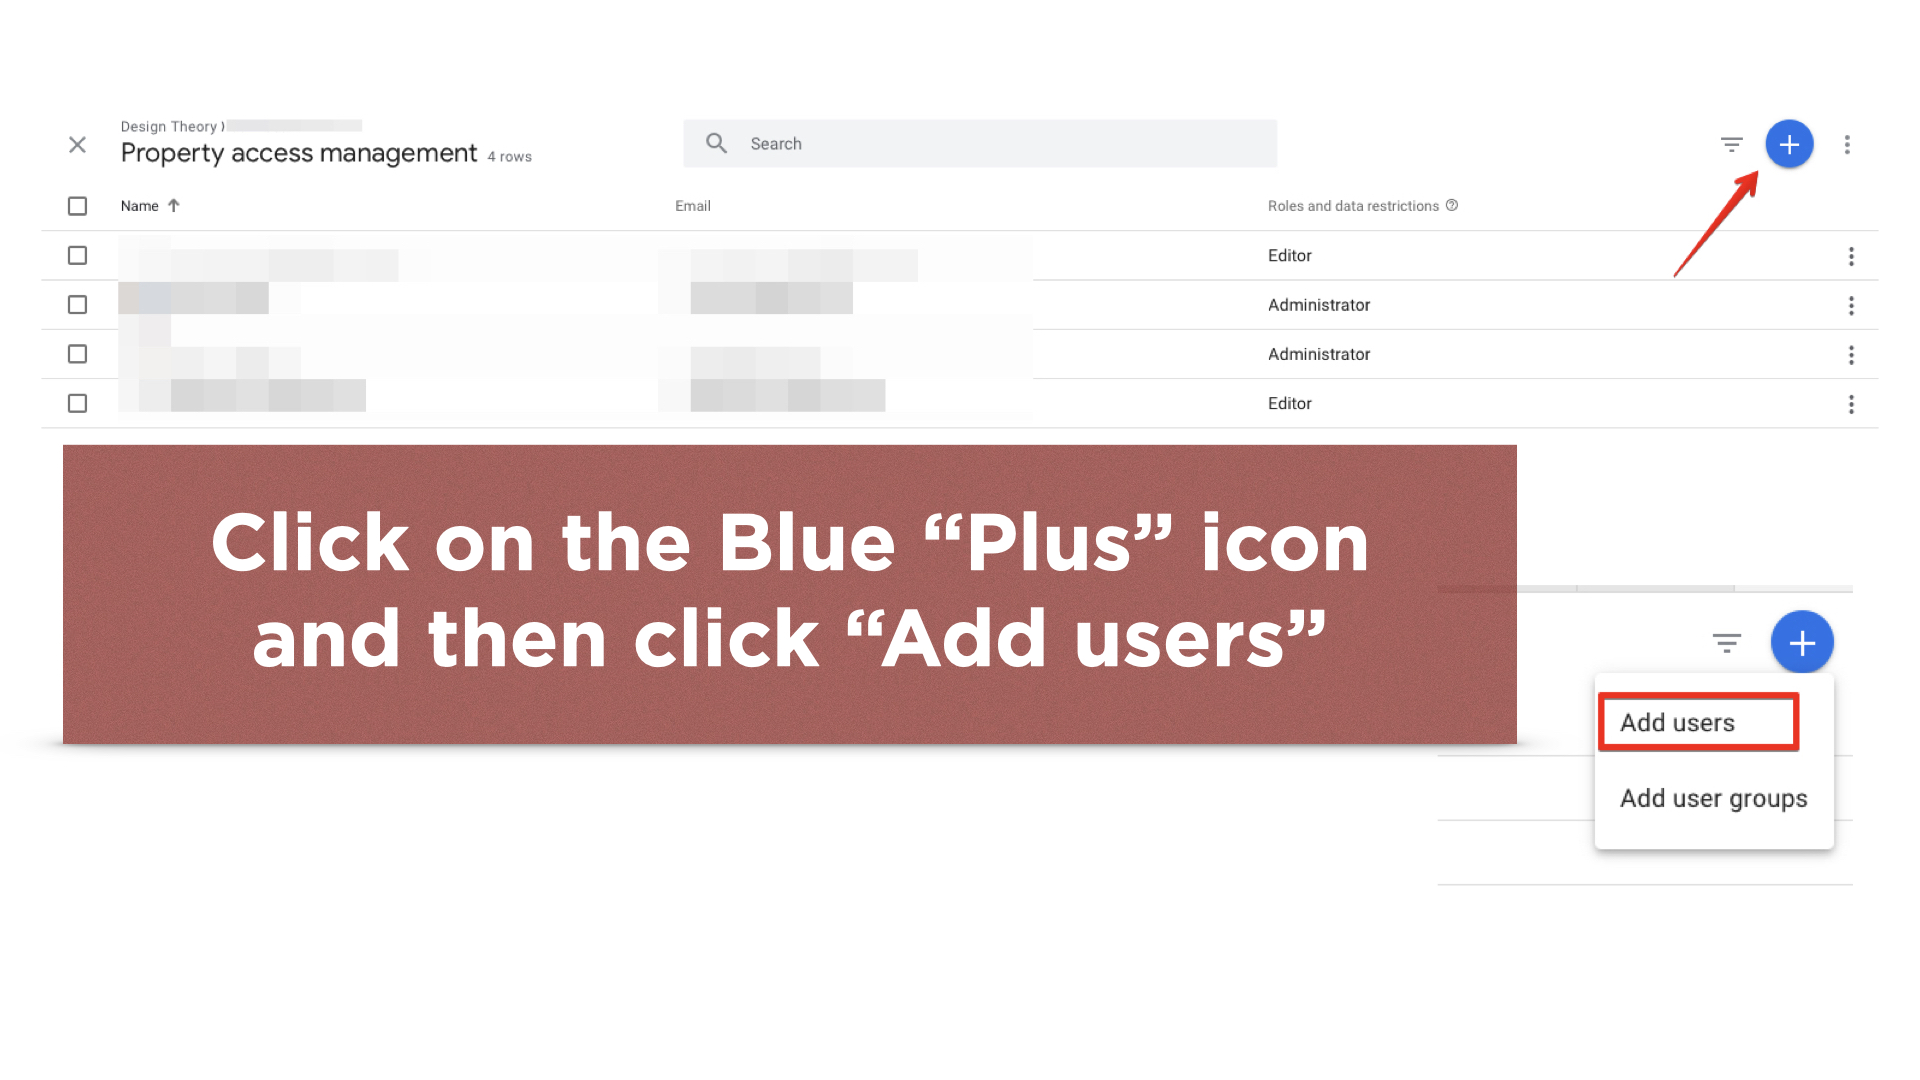
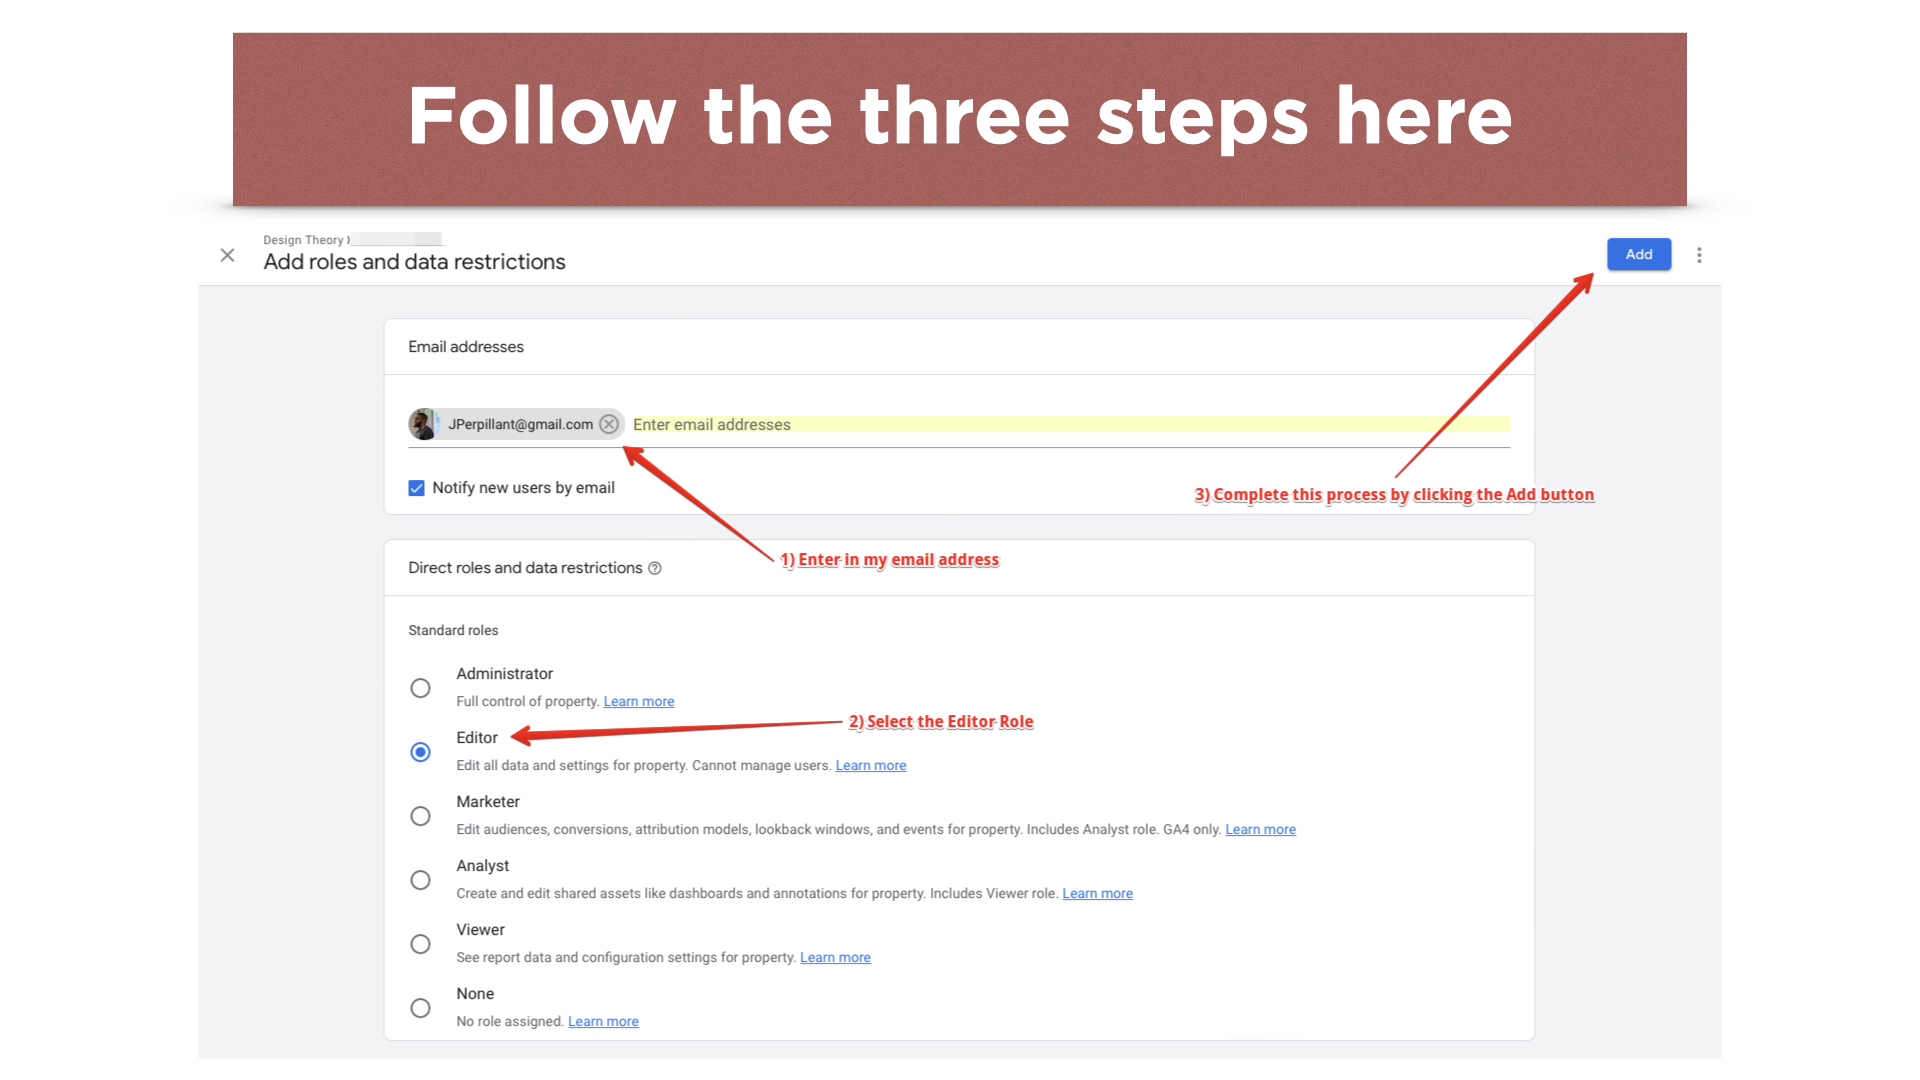
Google Analytics is a powerful tool for tracking website traffic and user behavior. However, sometimes you need to share access to your Google Analytics account with other people, such as team members or clients. In this quick blog post, we’ll show you how to easily add a new user and provide specific access for Google Analytics, so you can collaborate and share data with others. Whether you’re a business owner, marketer, or developer, this will help you quickly perform this process.
If you’ve ever wondered how to get your logo on all of your videos in YouTube, this quick tutorial video is for you. We had a few people ask us how to add their logo at the bottom right of their videos on YouTube and we thought creating a quick video would be best to help everyone out. It only takes a few minutes to set up (once you have your transparent logo already created).
The advantages of doing this creates a consistent brand identity to all of your videos published on your YouTube page.
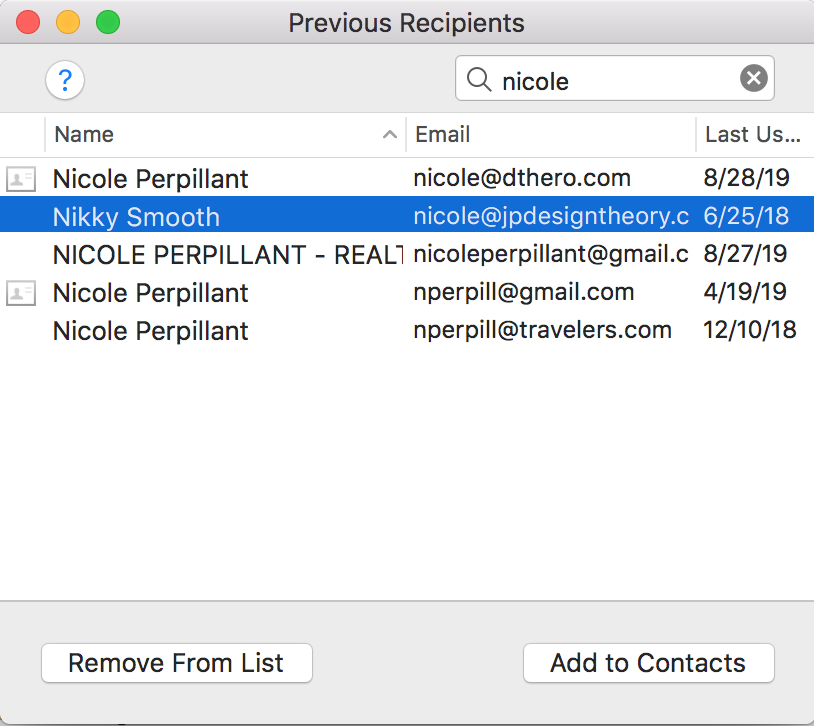
If you’ve been using Mac Mail for at least a year, you’ll acquire a lot of email addresses for people you have emailed or responded to. While many of them may not be in your Contacts list, their email addresses and names are stored in a cache of information that your Mac will suggest to you when you’re ready to create a contact in your address book from these interactions.
While that’s a great and helpful feature, it sometimes can be annoying when you’re trying to email a known contact and start typing in their name and the autofill or pre-fill address that comes up is an old email address. Or maybe their home email comes up instead of their work email. While you’ll be presented with a dropdown of alternate email addresses for this person, the default one that comes up may not be convenient for you and may sometimes lead to sending to the wrong address.
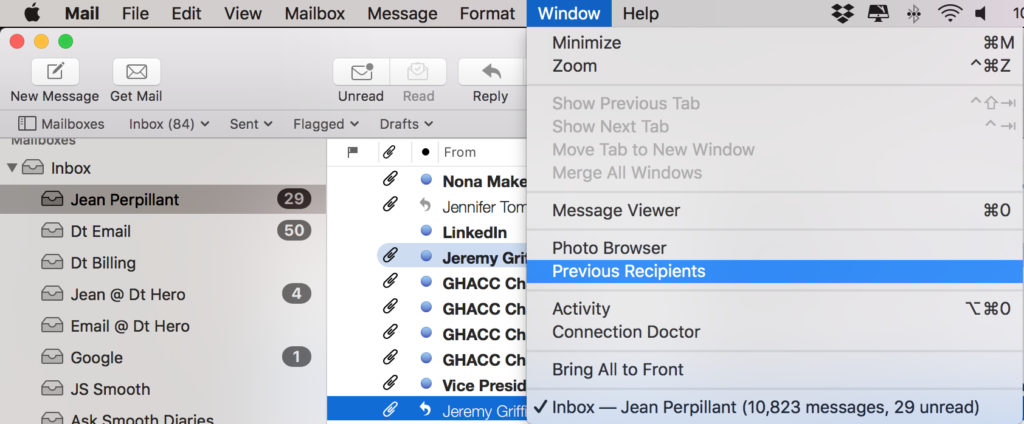
To fix this you’ll want to open up Mail, and click on the Window option from the top Menu Bar. From there you’ll select the Previous Recipients option:
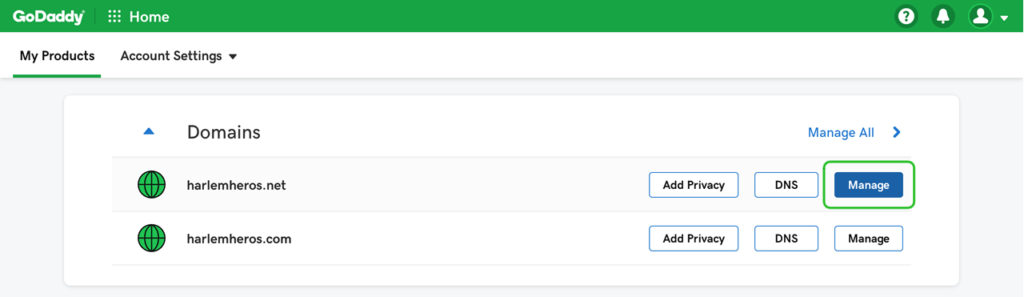
Over the years it has become a little easier to find certain domain information on various hosting provider control panels. However if you’re not in these areas often like a developer, it could be a bit confusing on how to find the information you’re looking for without clicking around and seeming to be going in circles. With the following screenshots and steps you’ll be able to find your domain authentication code (AUTH) in order to transfer your registered domain from GoDaddy to another hosting provider.
To start you’ll need to log into your account and get to My Products. From there you’ll see your list of domains. Click the MANAGE button to the right of the domain you’re looking to get the AUTH code for.
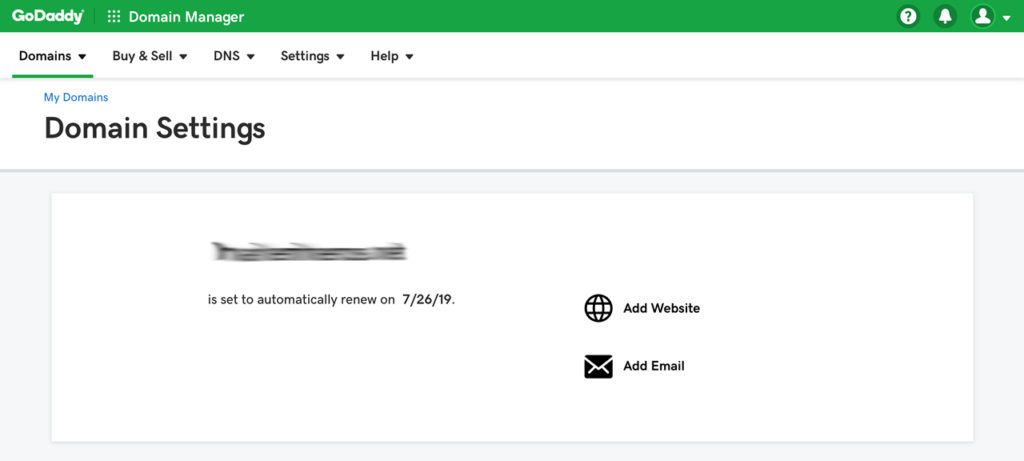
Once you click that you’ll be taken to the Domain Settings page. Scroll down from this view.
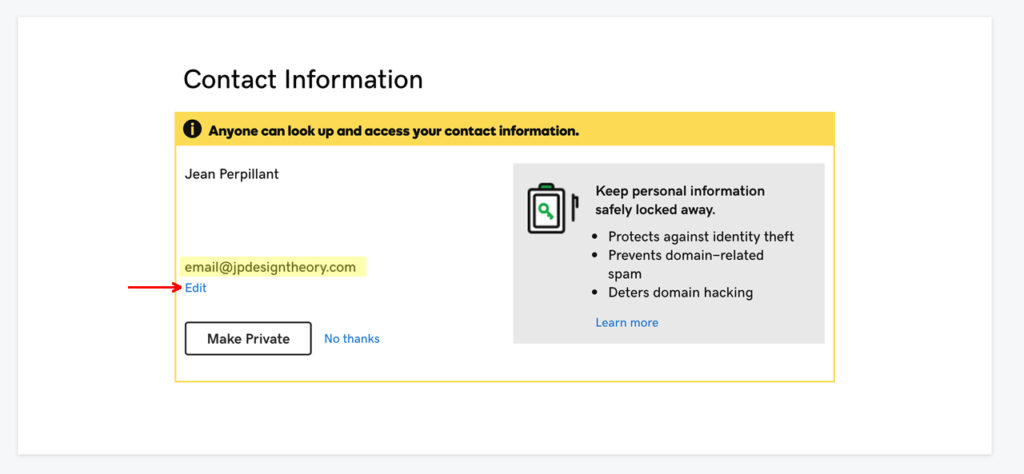
Next you’ll want to edit the domain contact information. If this shows a different name, address, or email address you’ll need to update this before you continue further. Otherwise the AUTH code that you want to retrieve will be sent to the person listed and email address listed here.
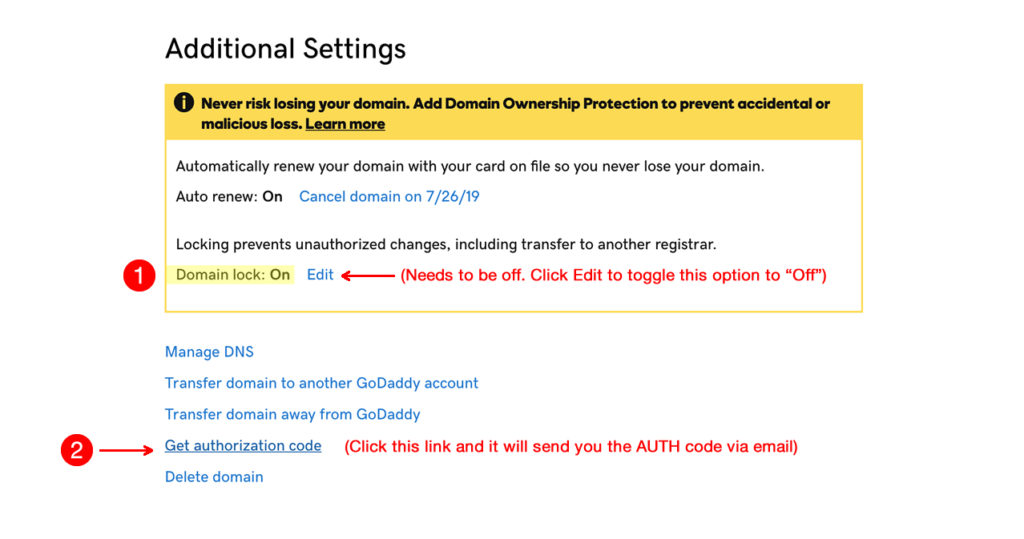
Next you’ll need to update the Domain Lock. By default you’ll usually find this set to “On”. But in order to transfer the domain away, you’ll need this to be toggled off. This is a security feature to help keep your registered domain from being illegally or illegitimately transferred to a new owner.
So click the “edit” button and flip the toggle to turn this option off. Then you’ll see the “Get authorization code” link below. Click that and this will prompt an automatic response to email the code to the email address that was listed above in the Contact Information area.
And that’s it. The code is usually emailed out in minutes, where you can then initiate the domain transfer with your new hosting provider by using the AUTH code. Transfers usually take 7-10 days, but we’ve been able to process some in one day if all the domain transfer acknowledgements happen as soon as they are received. What normally happens is when a transfer request is sent, the registered email from the current hosting provider is sent an email to acknowledge the transfer. In that email is a link to a secure page to either accept or deny the domain transfer. Once that is completed there may be another email to the new hosting account to also acknowledge the transfer. Once approved the release is usually done in hours, though internet propagation can take 24 hours.
We hope this was helpful for you! If you have any questions be sure to Contact Us.